
What Is the DP752 and Why You Need to Register a Handset
You may have just installed your Grandstream DP752 base station, and now you want to know how you can use your DECT handset (such as the DP720, DP722 or DP730) with your new base station. That is where handset registration enters the picture.
The DP752 is not an ordinary cordless base; it is a high-end VoIP DECT base station that will suit home and office. However, your base station and your handset do not automatically connect out of the box. This is the reason why you should register your handset manually with DP752 before you are able to make or receive calls.
What then is the meaning of registering? It is just the way of matching your compatible DECT handset with the base so that they can communicate to each other through a wireless signal safely. It is a bit like pairing Bluetooth headphones with your phone; you cannot use it until they are paired.
Do I have to register all handsets?
Yes, each handset you desire to employ must be registered singularly to the DP752 base. Fortunately, it is a simple and fast task as soon as you are aware of the procedure (which we will guide you through in a moment).
At the end of this guide, you will not only know how to register a handset with DP752 but also you will know how to troubleshoot common problems including how to handle many handsets without having to call tech support.
Pre-Registration Checklist: Avoid These Common Mistakes
We should get a couple of things out of the way before proceeding any further as to how to register a handset with the DP752. These are basic, yet necessary precautions that will help you avoid a lot of frustrations later, at least in case the registration does not go through the first time.
Here is a short checklist to ensure that you are prepared:
1. Ensure your DECT Handset is Charged
Ensure your Grandstream handset (DP720, DP722, or DP730) is charged and powered-on. A weak battery may cut off the pairing or the device may close in the middle of the registration.
2. Turn on the DP752 Base Station
Ensure that the DP752 base station is successfully plugged to power and your network (using Ethernet). The LED must not be blinking or off.
3. Make the Handset and Base Near Each Other
The base and the handset must be a few feet apart. Otherwise, when they are too far away, DECT pairing may fail because of poor signal strength.
Why do my handset and the base not pair?
It is usually a simple thing, a low battery, too far, or pairing mode disabled on the base station. This checklist does away with such risks.
4. Know Your Registration PIN (Default: 0000)
In case you see a request to enter PIN in the process of pairing, enter the default: 0000, unless it has been modified in the settings of the base station. Most of the users end up here due to the lack of or forgetting the PIN.
5. DECT Compatibility Check
The DP752 can only register compatible DECT handsets such as DP720, DP722 and DP730. The registration will fail in case you are using a different model or brand.
Is it possible to registrar non-Grandstream handsets to the DP752?
Unfortunately, no. The DP752 is compatible with the DECT models of Grandstream.
Having checked all the boxes, your gadgets are now ready to proceed to the next stage, which is initiating the pairing and subscribing your handset to the DP752 base.
How to Register Handset with DP752
Your devices are prepared now, so we can go through the process of registering a handset with the DP752 base station. It is a fast process which involves some simple steps. You do not have to be an expert in tech-related skills, all you have to do is keep up and you will be on your feet in no time.
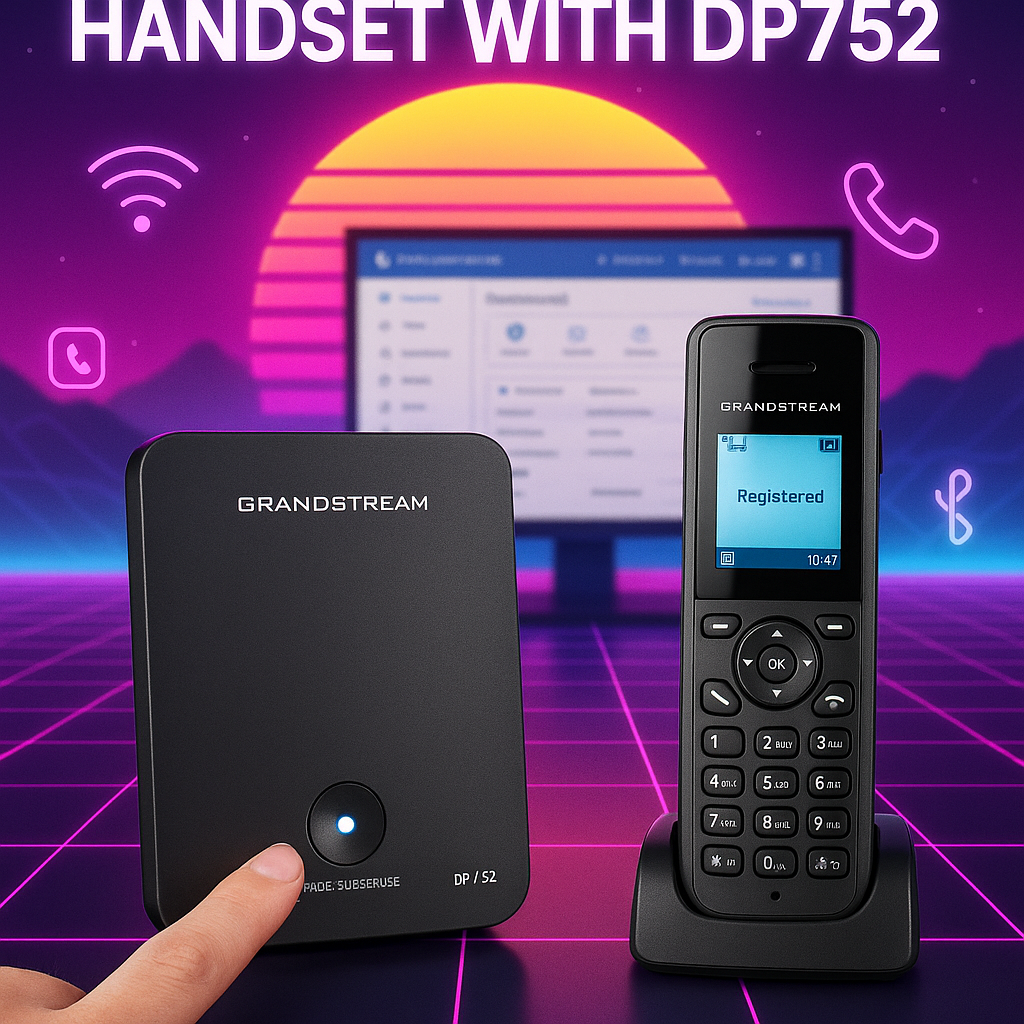
1. Step 1: Turn ON Pairing Mode on DP752 Base Station
To begin with, you must place the DP752 base station in subscription mode. Here’s how:
- On the DP752 (this is typically on the front or side), find the Page/Subscribe button.
- Hold the button down approximately 5 seconds until the LED light begins flashing a series of green lights- this will indicate that the base is now ready to pair.
Hint: The LED should be flashing. In case it remains solid or off, go through the press-and-hold procedure again.
Step 2: Handset Subscription to the Base Station
It is now time to register hand set (e.g., DP720, DP722, or DP730) to the blinking base.
On the phone:
- Click on Menu > Registration > Register.
- Choose Base 1 (or any other base slot).
- Choose Subscribe.
- Press the PIN code – the default is 0000 unless it has been changed.
What happens when the PIN fails?
It could have been changed by you or your network administrator. The registration PIN can be checked or reset by logging into the web GUI of the base.
Step 3: Waiting of the Confirmation
After the handset is connected, you will receive a confirmation message such as:
- Handset Registered or
- The handset will show a base icon containing signal bars.
Meanwhile, the LED on the base station DP752 will cease blinking and go to solid once again, which indicates that pairing is successful.
What is the way to see whether my handset is connected correctly?
You must find the registered base on the screen of the handset, as well as the strength of the signal. When you make a call, you will get a dial tone.
Still Not Registered? Here’s What Might Be Going Wrong
In case you have gone through the process of registering a handset with DP752 and yet your handset fails to connect, then donot panic. And you are not the only one. Problems with registration are normal, particularly when it is your first time configuring a DECT handset with the DP752 base station.
So, let us review the most common problems and the way to overcome them fast:
1. The Battery on the Handset Is Low
Registration may silently fail due to a battery that is almost drained. It is always advisable to charge your handset fully when pairing.
Hint: When you use the menu, the handset switches off or lags, this is an indication that the battery is too weak.
2. The Base and Handset are too Separated
To establish a connection, the DECT handset must be in range of the DP752 base typically 1-2 meters during registration.
How can I pair my handset in a different room?
Not reliably. Whenever you are pairing, do it near the base.
3. Incorrect or Replaced PIN Code
The default PIN of the registration is 0000, and in case of it being changed (deliberately or by the IT), pairing will not occur.
To reset or check your PIN:
- Access the web interface of the DP752 (through its IP)
- Go to: Profiles > DECT > Subscription Settings
- Find or re-set the System PIN
4. Pairing Mode Was Not Enabled Correctly
In case you cannot see the LED on your DP752 base blinking, it is not in pairing mode.
- Long press the Page/Subscribe button on the screen (5 sec)
- Confirm LED blinks – this indicates pairing mode is on
5. There are 5 Handsets Registered Already at the Base
The DP752 has a maximum of 5 handsets. When it is full, new registrations will not take place.
To verify existing registrations:
- Log in to DP752 admin panel
- Take away dead or idle handsets
Tip: Clear old handset slots in case you have registered other devices before.
Bonus Fix: Power Cycle All
Other times it is only a matter of restarting:
- Put the handset off and the base off 30 seconds
- Re-establish the power and repeat the registration process
Registering Multiple Handsets or Switching Between Base Stations
The Grandstream DP752 is a flexible device, you can register five DECT handsets and only one base station. This implies that you can install devices in your team, home, or even rooms conveniently.
This is how to use multiple handsets or to change base stations:
Adding a Second, Third or Fifth Handset
To add more handsets to the DP752, follow the same instructions above:
- Place the DP752 base station in pairing mode (Page/Subscribe button -> wait till LED is blinking).
- In the second handset, navigate to Menu > Registration > Register.
- Choose Base 2, 3, 4 or 5, whatever is available.
- Insert the PIN (the default is 0000).
FAQ: Do I have to do it on every handset?
Yes. The handsets must be registered separately; however, you can use the same base station with five handsets.
Handset Switching among Base Stations
You may operate in a multi-floor office or simply have two units of DP752, and you may desire to connect a handset to another base or even alternate between the bases.
To switch:
- On the handset go to: Menu > Settings > Base Selection
- Select Manual or Auto
- Choose between available registered base stations (Base 1, Base 2, etc.)
This comes in handy when:
- You changed your place of residence
- You work out one base
- You belong to a moving team operating with various units
Tip: Label your bases (admin portal) either with names or numbers so you can easily find them.
DP752 Web Interface Management of Registered Handsets
To check the number of devices that are registered already:
- Connect to the Web admin interface of the DP752
- Status > DECT Base > Handset List
- It is possible to delete, rename and reset handsets here
This comes in particularly handy when:
- You sold or lost a handset
- You have hit the 5-set mark
- There is a handset that is registered but not responding
Learning to use your Grandstream DP752 base station to its full potential is easy when you know how to register multiple handsets and how to switch bases, which you can do whether you have a busy office or just want cordless freedom at home.
Pro Tips for Smooth DECT Pairing Experience
At this point, you have been taught the entire process of how to register a handset with DP752 but we will go one step further. These pro tips will assist you to avoid hiccups and make your registration process as easy as possible particularly when you are registering numerous handsets or registering in a business environment.
1. Maintain Your Firmware Up to date
At any time prior to commencing any registration, ensure that you have the latest firmware on your DP752 base station and handsets (DP720/DP722/DP730).
- The bugs that are involved in pairing are usually corrected through firmware upgrades
- The official Grandstream firmware page has a link to the latest version
2. Exclude Interference of Other Devices
DECT operates on a certain frequency basis. You can be affected by signal interference when your base station is too near routers, microwaves or cordless phones.
- Keep your DP752 1-2 feet away from other electronics
- In the case of bigger installations, DECT repeaters can be used to increase the range of the signal
3. Mark Your Handsets and Base Stations
When you are under control of several devices, it is a good idea to name each handset and base through the web interface. This facilitates the process of troubleshooting and base swapping.
- Access Settings > DECT > Handset Name
- Label them with names such as Reception, Manager Desk or Warehouse Unit
4. It is important to Reset and then Re-Pair
If you are attempting to sign-up a handset that has been utilized on another base:
- The first step is factory resetting the handset
- Then begin a new pairing procedure with the new DP752
Pro Tip: This prevents concealed settings which may prevent new registrations.
5. Test Everything Before the Final Deployment
In the case of office settings, you should always test:
- Outbound and inbound calls
- Voicemail access
- The intensity of signals in various locations in the space
Some additional minutes during testing can save a lot of downtime in the future.
Final Check: Are You Successfully Connected?
The hard part is done now it is time to make sure that your handset is correctly registered with the DP752 and all is ready to be used.
Handset Displays Registered Condition
After registering your handset, you ought to get one or more of the following on the screen:
- Handset Registered or the like message
- Signal bars around a base icon
- The name or extension number assigned to the handset, “should be set”
DP752 Base Station LED Behavior
The LED on the DP752 tells you everything:
| LED Status | Meaning |
| Blinking | Pairing mode active |
| Solid | Registration successful |
| Off | Base not powered or pairing failed |
If your LED is solid, it means the DECT pairing is complete, and your base is connected.
Test Call Give a Test Call
To test everything is working, dial a test number or extension:
- Dial tone Checking
- Make a test call
- Accepts outgoing calls on the handset
Tip: When your handset rings and connects, you are 100 percent set.
You are All Set!
You have just learned the complete process of registering a handset with the DP752. You have a great wireless VoIP system that is ready to use whether you are establishing a small business or merely starting out at home.
In case this guide was useful to you, share it with your team or save it to your bookmarks to use it later in the background of registrations.