
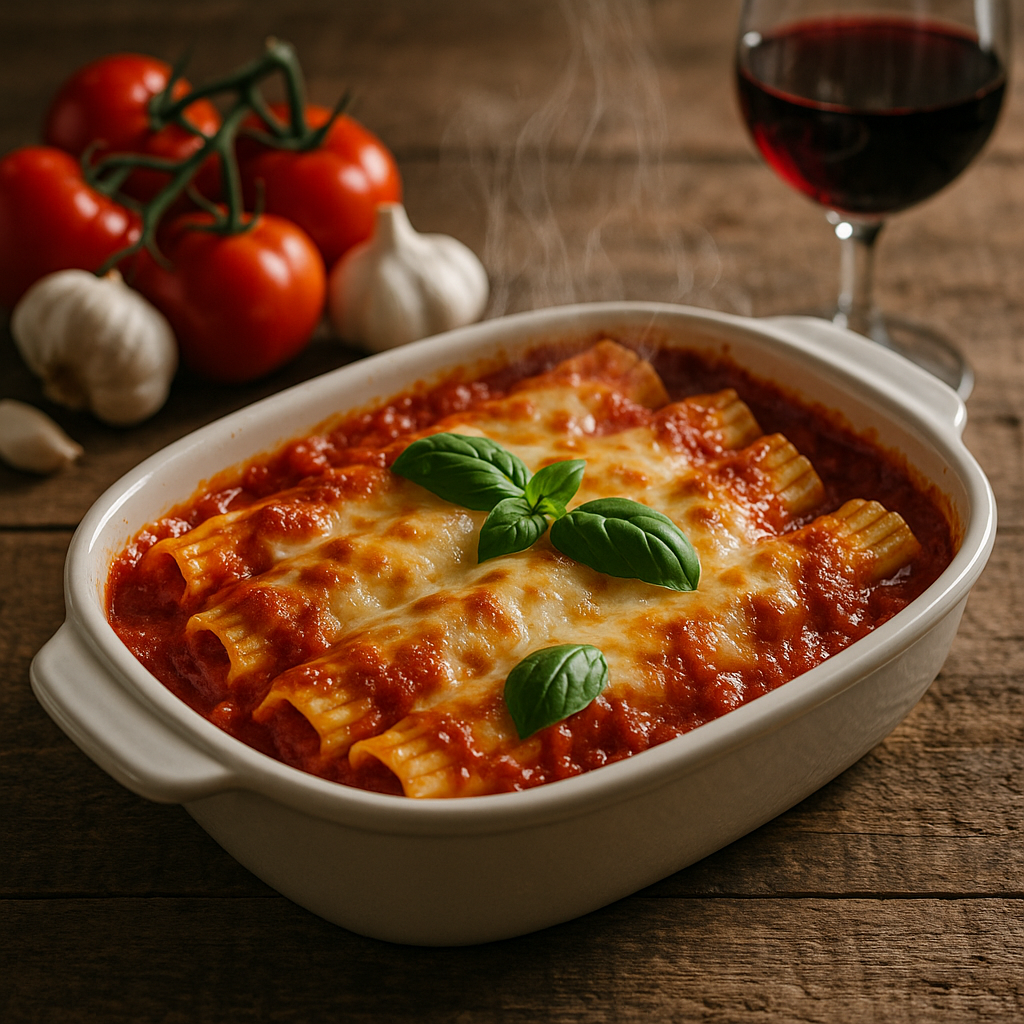
Manicotti (aka “Mannacote”) — What Is Manicotti and Why It’s Loved
If you’ve ever spotted the word “mannacote” online, there’s a good chance it was actually meant to say manicotti.
Manicotti is a delicious Italian American pasta dish made with large pasta tubes (or sometimes thin crepes) stuffed with creamy cheese fillings, baked in sauce until bubbling and golden.
Think of it as pasta meets lasagna — but rolled up and extra cozy.
I still remember the first time I made manicotti at home: the smell of bubbling marinara filling the kitchen and that satisfying moment of pulling the dish from the oven… pure joy.
Why is it loved?
Because it’s comfort food at its finest. You get tender pasta, a rich cheese filling, and a sauce that ties it all together — whether that’s classic marinara, a hearty meat sauce, or even a creamy white sauce for a twist.
Is “mannacote” the same as manicotti?
Yes — “mannacote” is just a common misspelling or pronunciation variation of manicotti. The recipe and dish are the same.
Is manicotti authentic Italian?
Not exactly. In Italy, a very similar dish is called cannelloni. Manicotti, as we know it in the US, is an Italian American adaptation — and it’s a staple in many family cookbooks here.
Manicotti Ingredients — What You Need (and Smart Substitutes)
When it comes to manicotti, the magic is in the filling and the sauce. But the real secret? Choosing ingredients that work for you — your taste, your budget, and what’s in your pantry.
Manicotti Shells — Dry, Fresh, or Crepe-Style Manicotti
Most stores sell dry pasta tubes labeled “manicotti.” They’re sturdy, affordable, and perfect for baking. Fresh pasta sheets can be rolled up, or you can even make thin crepes (yep, like breakfast crepes!) for a softer, melt-in-your-mouth texture.
My tip: If you’ve ever broken half your manicotti shells while boiling, you’re not alone. I once lost six in a row before I learned to stir gently and use plenty of salted water.
Can I use lasagna sheets for manicotti?
Yes! Just cook the sheets until tender, add filling, and roll them up. It’s a smart hack if you can’t find manicotti shells.
Manicotti Cheese Filling — Ricotta, Mozzarella, Parmesan
The classic filling is a mix of ricotta (for creaminess), mozzarella (for stretch), and parmesan (for flavor). Eggs help bind it together, so it stays put inside the shells.
Pro tip: Always taste your cheese mixture before stuffing — I learned the hard way that under-seasoned filling can make the whole dish feel flat.
What if ricotta is grainy or watery in manicotti?
If it’s watery, drain it through a cheesecloth or fine strainer for 20–30 minutes. If it’s grainy, that’s usually normal for some brands — adding a little cream can smooth it out.
Manicotti Sauce — Marinara, Meat Sauce, or Rosa
Marinara keeps things classic, meat sauce makes it hearty, and a creamy tomato-rosa adds richness. Use homemade if you can — but store-bought can work wonders if you doctor it up with garlic, herbs, or a splash of wine.
Does store-bought vs homemade sauce affect baking time?
Not really. Baking time depends more on the pasta and filling. But homemade sauces often have more depth of flavor.
Manicotti Prep — No-Boil, Par-Boil, or Pipe-and-Bake Methods
When it comes to getting your manicotti ready, there’s more than one way to do it — and each method has its fans. The right choice really depends on how much time (and patience) you have.
Manicotti Shell Prep — Preventing Cracks and Tears
Dry pasta shells can be tricky.
- Par-boil method: Boil the shells for just a few minutes until they’re bendable but not fully cooked. This makes it easier for them to stuff.
- No-boil method: Skip boiling and let the shells soften in the oven while baking. You’ll need a little extra sauce and longer bake time.
I’ve tried both, and honestly, on busy nights I skip the boiling. Less mess, less stress — and fewer shells breaking in the sink.
How do I stuff manicotti without breaking shells?
Use a piping bag or a zip-top bag with the corner cut off. Gently squeeze the filling in from both ends instead of trying to push it all through from one side.
Manicotti Filling Prep — Seasoning, Spinach, and Meat Options
A good filling should taste great before it even hits the oven.
- Cheese filling? Add fresh herbs like basil or parsley.
- Spinach version? Squeeze out all the water so your filling stays firm.
- Meat filling? Cook it fully and drain any excess fat before mixing in.
I once skipped draining spinach to “save time” — ended up with soupy filling that leaked all over my baking dish. Lesson learned.
Can I make spinach manicotti without squeezing spinach dry?
Technically yes, but you’ll get watery filling. If you’re short on time, press it between paper towels — it works in a pinch.
Manicotti Baking — Exact Time & Temperature for Consistent Results
This is where all your prep pays off — and where the oven does the heavy lifting. Baking manicotti is less about complicated technique and more about getting the timing and moisture right.
Manicotti Oven Settings vs. Conventional
For most home cooks, 375°F (190°C) is a sweet spot.
- Conventional oven: Bake for about 30–35 minutes covered, then uncover for 10 minutes to brown the cheese.
- Convection oven: Drop the temp to around 350°F (175°C) and keep a closer eye on it — it cooks faster.
I always keep foil on for most of the bake to trap steam, then pull it off at the end for that golden, bubbly top.
How long to bake manicotti at 375°F/190°C?
About 40–45 minutes total — 30–35 covered, 10 uncovered.
If your shells are no-boil, add an extra 5 minutes.
Manicotti Doneness — How to Tell It’s Perfect
You don’t need to guess. Here’s what I look for:
- Sauce bubbling at the edges
- Cheese melted and slightly browned on top
- Pasta tender when pierced with a fork
- Filling hot all the way through (you can check with a thin knife — it should come out hot to the touch)
Why is my manicotti soggy or underdone?
Usually it’s from too much sauce or underbaking. Try reducing the sauce a bit or extending the uncovered bake time.
Manicotti Variations — Classic Cheese, Spinach, Beef, and Gluten-Free
One of the best things about manicotti? It’s like a blank canvas. Once you know the basics, you can customize it to fit your mood, your guests, or whatever you’ve got in the fridge.
Classic Cheese Manicotti
This is the traditional version most people know of: ricotta, mozzarella, parmesan, maybe a pinch of nutmeg for warmth. It’s simple, creamy, and never disappointing. I make this when I want that “Sunday dinner” vibe without too much fuss.
Spinach Manicotti
Add finely chopped, well-drained spinach to the cheese mixture for extra flavor and color. Not only does it taste fresh, it sneaks in some greens for those who “don’t like veggies.”
Can I skip squeezing spinach dry for manicotti?
I wouldn’t. Even a little extra water can make your filling runny and change the texture.
Beef or Sausage Manicotti
For meat lovers, brown ground beef or Italian sausage, drain well, and mix with your cheese filling. It makes for a hearty, stick-to-your-ribs dish. Perfect for winter nights when you want something satisfying.
Should I cook meat before stuffing manicotti?
Yes, always. Raw meat won’t be fully cooked inside the pasta during baking.
Gluten-Free Manicotti
Use gluten-free pasta shells or roll your filling inside thin gluten-free crepes. The crepe method is softer and often holds together better than GF dry pasta.
Can I make gluten-free manicotti that doesn’t fall apart?
Yes — crepes are your best bet. They’re flexible and don’t crack like some GF pasta.
Manicotti Make-Ahead — Freezing, Reheating, and Meal-Prep
Manicotti is one of those rare dishes that tastes just as good reheated — maybe even better, because the flavors have had time to mingle. This makes it perfect for meal-prep, busy weeknights, or feeding a crowd without cooking on the day of.
Manicotti Storage — Fridge vs Freezer
- Fridge: Store baked manicotti in an airtight container for up to 3–4 days.
- Freezer: You can freeze it before or after baking. I prefer freezing before — the pasta comes out fresher when baked the first time after thawing.
My tip: Always label with the date and baking/reheating instructions. Trust me, your future self will thank you when you pull it out a month later.
Freeze manicotti before or after baking?
Either works, but freezing before baking usually gives better texture when reheated.
Manicotti Reheat — Oven and Air-Fryer Methods
- Oven: Cover with foil, bake at 350°F (175°C) until heated through (about 20–30 min from chilled, 40–50 min from frozen).
- Air fryer: Works for smaller portions — heat at 320°F (160°C) until hot, about 10–15 min.
I’ve found that adding a splash of extra sauce before reheating keeps the pasta from drying out.
Why does reheated manicotti release water?
That’s usually from excess moisture in the filling (spinach, ricotta) or from freezing without wrapping tightly. Drain or wrap well before freezing to reduce this.
Manicotti Troubleshooting — Common Mistakes and Quick Fixes
Even the most seasoned home cooks have had a manicotti mishap or two. The good news? Most problems have an easy fix — and often, you can save the dish before anyone notices.
Manicotti Texture Fixes — Watery, Dry, or Split Filling
- Watery filling: Usually from un-drained spinach or ricotta. Quick fix? Stir in extra grated parmesan or a spoon of breadcrumbs to absorb the liquid before stuffing.
- Dry filling: This can happen if you use too little sauce or overbaking. Next time, keep it covered longer and use a bit more sauce.
- Split filling: If the cheese mixture looks grainy after baking, it’s often from too much heat. Lower the temp slightly next time.
I’ve been there — once served manicotti so watery, I had to scoop it with a spoon. Lesson learned: drain, drain, drain.
How do I fix watery manicotti filling last-minute?
Mix in a handful of breadcrumbs or extra parmesan. It won’t be perfect, but it will firm up enough to bake.
Sauce Problems — Too Runny or Too Thick
- Too runny: Simmer longer before using or bake uncovered for the last 15 minutes.
- Too thick: Loosen it with a splash of broth, wine, or pasta water.
Can I thicken manicotti sauce after assembling?
Not easily. It’s best to adjust before pouring over the pasta.
Manicotti Nutrition & Serving — Portions, Sides, and Wine Pairings
Manicotti may be indulgent, but with a few smart tweaks, you can balance flavor and nutrition without losing that comforting feel.
Manicotti Nutrition — Calories, Protein, and Sodium Awareness
A typical cheese manicotti serving (two shells with sauce) runs around 350–450 calories, with about 15–20g protein — depending on the cheeses and sauce you use.
Want it lighter? Use part-skim ricotta, skip the extra mozzarella topping, and load the filling with spinach or mushrooms.
I sometimes swap half the ricotta for cottage cheese. Not only does it cut calories, but it adds a little tang and extra protein.
Is manicotti healthy for weeknight dinners?
It can be — especially if you use lighter cheeses, plenty of veggies, and pair it with a fresh salad.
Manicotti Plating — Crowd-Pleasers and Make-It-Special Tips
Serve manicotti hot, straight from the oven, with a sprinkle of fresh basil or parsley for color. Pair with:
- Garlic bread for soaking up sauce
- A crisp side salad for balance
- Roasted vegetables for a heartier spread
And if you want to feel extra fancy? Add a glass of Chianti or Pinot Grigio — it complements the rich cheese and tomato flavors beautifully.
Manicotti vs Cannelloni — Key Differences to Know
At first glance, manicotti and cannelloni look almost identical — long tubes of pasta stuffed with delicious fillings. But the differences are subtle and knowing them can help you choose (or substitute) with confidence.
Manicotti Comparison — Shape, Origin, and Typical Fillings
- Shape & size: Manicotti shells are usually ridged and slightly larger, making them easier to fill. Cannelloni are smooth and a bit smaller in diameter.
- Origin: Manicotti is an Italian American creation, while cannelloni is a traditional Italian dish.
- Fillings: Both can hold cheese, spinach, or meat, but manicotti recipes in the US tend to be cheese-heavy, while cannelloni in Italy often features more meat-based fillings.
I remember once mixing the two up at the store — ended up with cannelloni shells but made manicotti filling. No one at the table noticed… until I pointed it out mid-dinner.
Can I substitute cannelloni for manicotti 1:1?
Yes — just adjust baking time slightly if the pasta is thinner. Add a little extra sauce if needed, since cannelloni can dry out faster.
Manicotti Schema-Ready Elements — HowTo, Recipe, and FAQ Integration
If you’re planning to publish your manicotti recipe online, adding structured data (schema) can help search engines understand your content better — and can even land you those eye-catching rich results in Google.
Manicotti Markup — Required & Recommended Fields
- Recipe Schema: Include title, author, description, prep time, cook time, total time, servings, ingredients list, and step-by-step instructions.
- HowTo Schema: Perfect for a visual “how to stuff and bake manicotti” guide. Add images for each step.
- FAQ Schema: Works for all those common manicotti questions we’ve covered — from “How long to bake manicotti?” to “Can I freeze it before baking?”
When I added FAQ schema to my own recipe posts, I noticed a nice bump in clicks from search — people love seeing quick answers right in Google.
Should I add both Recipe and HowTo schema for manicotti?
Yes — if your post includes a recipe and a step-by-step guide with visuals, combining both can improve your chances of ranking in multiple rich result formats.